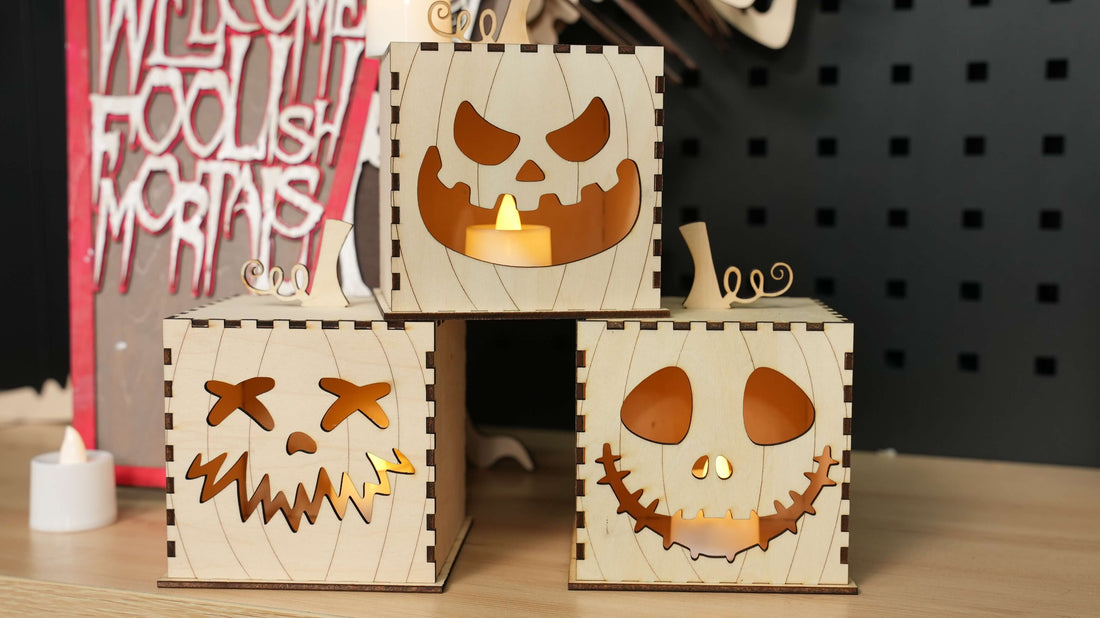
How to Make a Halloween Wooden Pumpkin Lantern with Wizmaker L1 - Step by Step Tutorial
Halloween is approaching, and it's time to showcase your creativity! With the Wizmaker L1 laser engraving machine, you can create a unique and stunning wooden pumpkin lantern to decorate your holiday. Let's get started!
Video Tutorial: How to Make a Halloween Wooden Pumpkin Lantern with Wizmaker L1 - Step by Step Tutorial
Design Files: Pumpkin Lamp Files

Materials List:
Wizmaker L1
Wooden board (here used a 3mm basswood board)
White Latex(or other wood adhesive)
paint
Websites involved:
https://www.festi.info/boxes.py
Steps:
- Design the Pumpkin Lantern File:
 |
 |
| Figure 1 | Figure 2 |
Here, you can see that there are labels for each setting. I usually only modify the material thickness. We are using a 3mm wooden board, so I set the material thickness to 3.2 to ensure better assembly of the cut pieces. Then, click "Download" (you may need to regenerate if you make other changes).
(2)Prepare Pumpkin Face Design Material
Using the website mentioned earlier, we obtained a preliminary box design. We need to make some modifications to it. You can open Pinterest or other image sources to search for pumpkin face SVG images. Here, we opened Pinterest and used keywords like "pumpkin face svg" (Figure 3) or "pumpkin svg" (Figure 4). Choose the pattern you like and download it.
 |

|
| Figure 3 | Figure 4 |
(3)Import the downloaded files and images into LightBurn and adjust them.
- After importing the files and images into LightBurn (Figure 5), click on the image, right-click the mouse, and select "Trace Image" (Figure 6) to access the trace image settings page (Figure 7). You can adjust the two buttons below to make your traced pattern smoother. If it's already perfect, like in my case, you can click "OK" to obtain an editable vector image (Figure 8).


Figure 5 Figure 6

Figure 7


Figure 8 Figure 8 -
The traced pattern is grouped together, so you need to ungroup it (Figure 9) and select the pumpkin face you want (click and drag to select). Group them together again to avoid losing parts when moving (Figure 9).


Figure 9 Figure 9 -
With the pumpkin face ready, go back to the box design you imported. Ungroup it first and delete unnecessary parts (Figure 10).


Figure 10 Figure 10
-
Drag the pumpkin face into one of the squares and adjust its size (Figure 11) and position (select both the pumpkin face and the square piece) (Figure 12).

Figure 11


Figure 12 Figure 12 -
At this point, we have completed most of the work. To make it look more like a pumpkin, we can draw some pumpkin patterns on it. Select the pencil icon on the LightBurn interface, click to start drawing at the desired location, and drag the mouse to create lines. Adjust the curvature by dragging until it's right. Release the mouse button and press "Esc" on the keyboard to stop drawing. Don't worry about the parts that extend beyond the box (Figure 13).

Figure 13 -
When you have completed one side, you can group it. Since we have different parameters for engraving and cutting, you can choose different colors to distinguish them (Figure 14). Use Ctrl+D to duplicate it into the other three squares and adjust them to the appropriate positions (Figure 15).


Figure 14 Figure 14

Figure 15 -
We also need to add a pumpkin vine on top. Following the same steps, trace the vine, remove unnecessary parts, and use Boolean Union to combine them (Figure 16). And adjust the size.


Figure 16 Figure 16 Figure 16
-
To insert the vine into the top of the box, we need to create a slot. Since we have a 3mm wooden board, measure the length of the vine's bottom end using a ruler (Figure 17). Then, create a small block, ensuring it's 3mm wide and shorter than the vine's length (Figure 18). Duplicate it for later use, and use Boolean Union to combine the block and vine. Place the duplicated block in the center of the top (Figure 19).

Figure 17


Figure 18 Figure 19 -
Now, we have completed the design (Figure 20).

Figure 20
-
Parameter Setting:
Before setting the parameters, we need to clarify which layers are for cutting and which are for engraving. Based on our design, the black and blue layers are for cutting, while the yellow layer is for engraving. Although it's in "Line" mode, we need to increase its speed and reduce the power to avoid cutting it (Figure 21). Generally, it's better to engrave before cutting to prevent misalignment.

Figure 21 -
Wood Preparation:
Prepare a suitable-sized wooden board and place it on the laser engraving machine's work table, ensuring it is stable and level
-
Connect the Machine, Adjust the Focus, Outline, and Ensure the Engraving Range is Within the Wood:

-
Start Engraving and Cutting:
Click the "Start" button to begin engraving. If you have purchased Wizmaker foldable dust-proof enclosure and Wizmaker air purifier smoke filter, install them before placing the wooden board to effectively prevent smoke from escaping.
-
Completion and Assembly:
Once the cutting is complete, gently remove the pumpkin lantern design from the wooden board. The design consists of multiple parts, glue them together to create a complete pumpkin lantern.
-
Illuminate Your Pumpkin Lantern:
Use small LED bulbs or candles to light up your wooden pumpkin lantern and add a festive touch to your holiday.
-
Get Creative:
Don't forget to add some creative elements to your design, such as expressions or unique textures, to give your pumpkin lantern more personality.。Now, you have a unique wooden pumpkin lantern ready to welcome Halloween! Making a wooden pumpkin lantern with the Wizmaker L1 is not only simple and fun but also allows you to showcase your creativity during the holiday.
Video Tutorial: How to Make a Halloween Wooden Pumpkin Lantern with Wizmaker L1 - Step by Step Tutorial
Design Files: Pumpkin Lamp Files

