Crafting Multi-Layered Decorative Paintings with Wizmaker L1 Laser Engraver
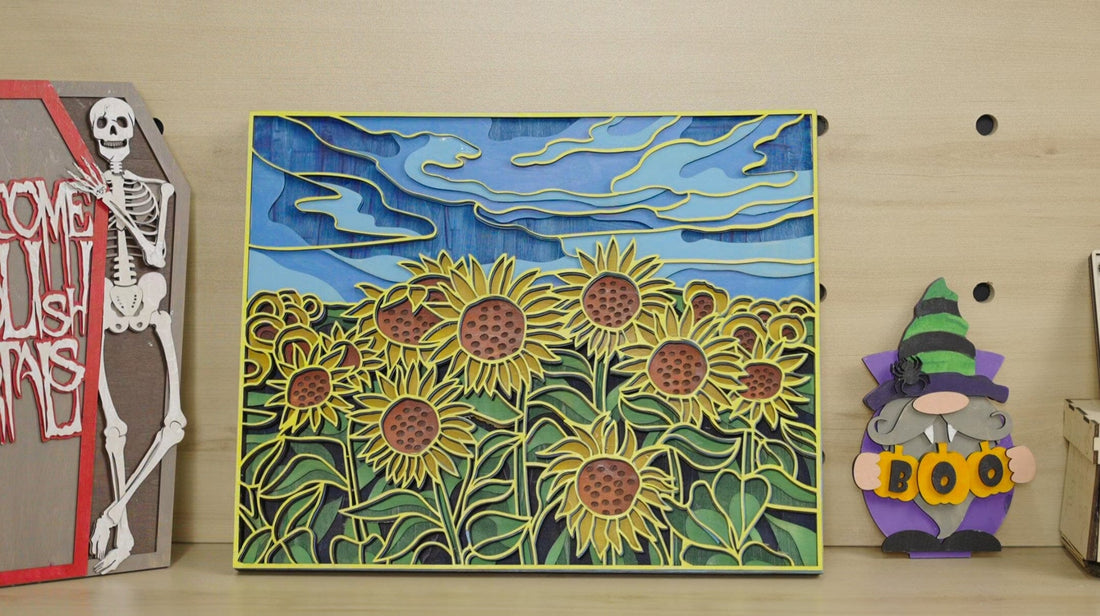
If you are a laser enthusiast or small business owner, multi-layer decorative painting is a must-try. These are one of the hot selling and loved items in online stores. People use them for weddings, special occasions, restaurants, decorations, homes, and more. It has many uses and looks eye-catching.
Beginners may be intimidated by the complex designs when cutting multi-layered decorative paintings for the first time. To make the experience easier, here is a complete and detailed guide to creating multi-layered decorative paintings. We will take you step by step from the materials, machines, accessories needed for multi-layer decorative paintings, as well as how to change the design size, parameters, etc.
Let's start!

Materials and Tools You'll Need:
- Laser Engraver: 12W, 24W, and 36W laser engraving machines can be produced, and different parameters can be set according to each person's machine.
- Accessories:Multi-layer decorative painting design is basically used for cutting. This requires the use of honeycomb panels and air assist, which can reduce burning marks during cutting.
- Material:Wood board, cardboard, acrylic, etc. These are all acceptable. In this article, we chose wood board.
- Engraving Software:Lightburn/LaserGrbl, In this article, we chose wood board.
Steps to Create Multi-Layered Decorative Paintings:
- PrepareYour Layer Designs:
- You can directly download design files for free from some websites. Here is a recommendation: Free Laser Cut Files & Designs: The Best Sites of 2023; or you can buy them on etsy and search for the keywords "Laser cutting file", "Multi-layer laser cutting file"
-
If you have a design foundation, you can use some graphic design software to create pattern designs
-
Import designs into LightBurn
After importing the design into LightBurn, you can adjust it according to the size you want and set the parameters. Here is an instructional video showing how to split the design: Separation guidance for multi-layer designs in Lightburn.
-
Prepare the Wooden Boards:
Cut or prepare wooden boards according to the size of your design layers. These will become the individual layers of your painting.
-
Cutting Each Layer:
Load one wooden board at a time into your wizmaker L1. Use the LightBurn to cut the design for each layer onto the wooden surface. Adjust the laser settings (speed, power) to achieve the desired cutting effect. Be patient, as this step may require multiple passes for intricate details.
-
Stack and Assemble:
Once all your layers are cutted, it's time to assemble your masterpiece. Stack the wooden boards in the desired order, ensuring that each layer aligns perfectly with the others. Use glue or adhesive spacers to secure the layers in place. This step is where the magic happens, as the layers combine to create a three-dimensional effect.
-
Frame and Display:
Finally, frame your multi-layered decorative painting to protect and showcase your artwork. Choose a frame that complements your design and find the perfect spot to display your creation.
Tips for Success:
Experiment with different depths and layer arrangements to achieve the desired 3D effect.
Test your laser settings on scrap wood to ensure you achieve the engraving depth you want.
Consider painting or staining the wooden layers before assembly to add even more visual interest.
Choose designs that lend themselves well to this technique, such as landscapes, portraits, or intricate patterns.
Creating multi-layered decorative paintings with the wizmaker L1 laser engraver is a captivating way to bring your artwork to life. The precision and versatility of the wizmaker L1 empower you to explore endless creative possibilities and craft visually stunning pieces that will leave a lasting impression. Dive into the world of 3D artistry and let your imagination run wild with this remarkable tool.

